


How to Install a Carport: Expert Guide for Spring Projects

Spring is the perfect time to tackle home improvement projects, and installing a carport is an excellent way to protect your vehicles while improving the look and functionality of your property. Unlike a full garage, a carport is cost-effective, easier to set up, and requires less maintenance.
Whether you’re looking for a DIY challenge or considering professional help for carport installation, this expert guide will walk you through every step, from planning to installation and maintenance.
Step 1: Planning and Preparation
Check local regulations
Before you break ground, check your local zoning laws and permit requirements. Some areas may require approval, especially if the structure exceeds a specific height or square footage. Contact your local municipality to learn about any restrictions on carport size, placement, and materials. Additionally, check if there are any homeowner association (HOA) rules that may affect your carport installation.
Choose the right carport design
Carports come in various designs, and selecting the right one depends on your specific needs, budget, and aesthetic preferences:
- Standalone carports – Freestanding and flexible in placement, ideal for driveways and open spaces.
- Attached carports – Connected to your home, providing seamless access and additional shelter for walkways or patios.
- Material options:
o Metal carports – Durable, rust-resistant, and long-lasting. Galvanized steel is the most popular choice due to its strength and weather resistance.
o Fabric carports – A more affordable and temporary solution, perfect for short-term vehicle protection or additional covered storage.
o Wood carports – A stylish option that blends well with traditional homes but requires more upkeep, such as staining and sealing.
- Consider the roof style as well:
o Gabled roofs – Provide a traditional look and superior water drainage.
o Flat roofs – Offer a sleek, modern aesthetic but may require better drainage planning in wet climates.
o Curved roofs – Enhance wind resistance and add a contemporary design element.
Measure and choose the right size
Carports come in various sizes, and it’s important to select one that fits your needs:
- Single-car carport – Typically 12 feet wide by 16-20 feet long.
- Double-car carport – Usually 18-24 feet wide by 20-30 feet long.
- RV or boat carport – Needs extra height clearance (12-16 feet) and length (at least 30 feet).
When measuring your space, allow extra room for so you can comfortably do both vehicle storage and include any access features.
Gather essential tools and materials
Before starting the installation, make sure you have all the necessary tools and materials. Common tools include:
- Measuring tape and chalk line for precise placement.
- Level and plumb bob for ensuring even alignment.
- Hammer drill for securing posts and anchors.
- Socket wrench set and screwdrivers for fastening bolts and screws.
- Ladder (or scaffolding for taller structures).
- Safety gear such as gloves, glasses, and a hard hat.
Materials will depend on your chosen carport type but generally include:
- A carport kit, which contains the frame, roof panels, and fasteners.
- Concrete mix for securing posts, ensuring long-term stability.
- Gravel for foundation support, improving drainage, and preventing settling.
- Anchors and screws to reinforce structural stability, particularly in high-wind areas.
- Proper planning and preparation will make the installation process smoother and prevent common mistakes that could compromise the integrity of your carport.
Step 2: Site Selection and Preparation

Pick the best location
Selecting the ideal spot for your carport contributes to longevity and convenience. Here are the important factors to consider:
- Ease of access – Choose a location close to your driveway or entrance for easy parking.
- Ground slope – A level area is ideal; otherwise, grading may be necessary to create a flat foundation.
- Drainage considerations – Avoid areas prone to water pooling, which could weaken the foundation over time.
- Overhead and underground obstacles – Check for power lines, large tree branches, and underground utilities before beginning construction.
- Sunlight and wind exposure – Consider positioning the carport to provide optimal shade and wind resistance.
Prepare the ground
Proper site preparation ensures your carport remains stable and secure. Follow these steps:
- Clear the area – Remove all vegetation, rocks, and debris from the site.
- Level the surface – Use a shovel and rake to smooth out uneven areas. If necessary, rent a compactor for better stability.
- Mark the boundaries – Use stakes and string to outline the carport’s footprint. Double-check dimensions to ensure accuracy.
- Test for soil stability – Loose or sandy soil may require additional reinforcement, such as a deeper foundation or compacted gravel.
Choose a foundation type
Selecting the right foundation depends on your budget, climate, and long-term goals:
- Concrete slab: The most durable and stable option, ideal for permanent carports. Requires curing time (typically 7 days) before installation.
- Gravel base: A budget-friendly alternative that provides good drainage. Best suited for temporary or semi-permanent carports.
- Asphalt or paver base: Offers a solid surface with good durability but may require professional installation.
- Ground anchors: If installing directly on grass or dirt, heavy-duty anchors can provide stability but may not be suitable for areas with strong winds or heavy snow loads.
Proper site selection and preparation set the stage for a successful carport installation. Taking time to assess your location and prepare the ground will help ensure long-term stability and ease of use.
Step 3: Carport Installation Process

Installing your carport is an exciting stage that brings your planning and preparation to life. The process typically involves setting the foundation, assembling the frame, securing the roof, and stabilizing the entire structure. With proper attention to detail, you can have a durable and reliable carport that will stand the test of time.
1. Set the foundation and anchors
Follow these steps to establish a firm base:
- Dig post holes – Holes should be 3-4 feet deep and approximately 1 foot in diameter to provide adequate support.
- Add gravel for drainage – Place 6 inches of crushed gravel at the bottom of each hole to improve water drainage and prevent shifting.
- Set posts in concrete – Position the posts in the holes and pour concrete around them, ensuring they remain level and plumb.
- Allow curing time – Let the concrete cure for at least 24-48 hours before proceeding with frame assembly.
- Use anchors for additional security – If installing on an existing concrete slab, use expansion bolts or concrete wedge anchors to secure the base plates.
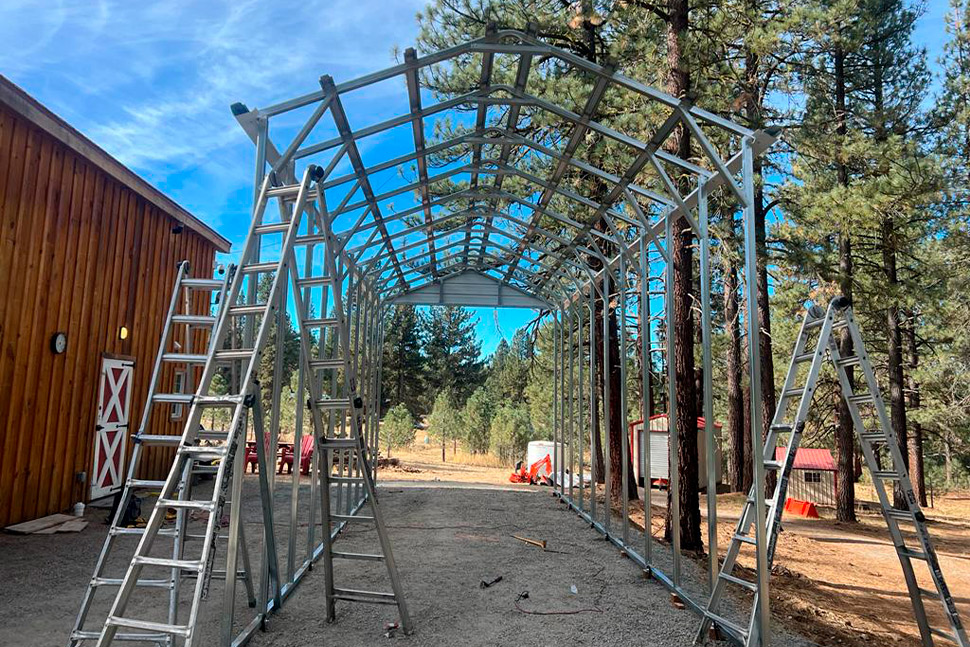
2. Assemble the frame
Once the foundation is set, it’s time to construct the frame:
- Attach support beams to the posts – Follow the manufacturer’s instructions to connect horizontal support beams securely
- Install horizontal purlins – These roof support beams run across the top and provide a framework for roof panel installation.
- Secure all fasteners and brackets – Double-check all bolts and screws, making sure they are properly tightened.
- Check for proper alignment – Use a level to verify that the frame is square and evenly positioned before moving to the roof installation.
3. Install the roof panels
The roof is the most critical component for protecting your vehicles and belongings from the elements. Here’s how to install it correctly:
- Start at one end – Align the first roof panel at one edge, ensuring a slight overhang for water runoff.
- Overlap each panel properly – Follow the manufacturer’s guidelines for overlapping to create a watertight seal and prevent leaks.
- Secure panels with screws and rubber washers – Use self-drilling screws with rubber washers to prevent water penetration at attachment points.
- Seal all gaps and joints – Apply weatherproof caulk along panel seams and fastener points for added durability.
4. Secure and stabilize the structure
Reinforcing your carport keeps it strong against wind and other environmental forces:
- Use additional ground anchors – In high-wind areas, adding extra ground anchors can enhance stability.
- Double-check all connections – Inspect every joint and fastener to ensure they are secure.
- Add diagonal bracing – Installing diagonal braces at each corner can increase structural strength, especially in regions with extreme weather conditions.
- Final alignment check – Walk around the structure to confirm all elements are properly aligned and tightened.
With these steps completed, your carport is now ready to provide reliable protection for years to come!
Step 4: Finishing Touches and Enhancements

Now that your carport structure is standing strong, it’s time to add the finishing touches that will enhance its durability, functionality, and appearance. These enhancements not only protect your investment but also ensure that your carport meets your needs for years to come.
Add protective features
- Trim and sealants: Applying weatherproof trim around the edges of the carport helps protect against moisture infiltration. Use high-quality silicone or polyurethane sealant at seams and joints to prevent leaks.
- Gutters and drainage: Installing a gutter system and downspouts will help direct rainwater away from the base, preventing erosion and foundation weakening. Consider using leaf guards to minimize maintenance.
- Side panels and enclosures: If additional protection from wind, rain, or snow is needed, installing side panels can provide extra shelter. Partial enclosures are a great option for added privacy and security while maintaining ventilation.
- Weather stripping: For metal carports, adding rubber weather stripping around connections can help block wind-driven rain and reduce noise caused by metal panels shifting in the wind.
Enhance aesthetics and functionality
- Paint and coatings: If your metal carport comes in a basic finish, consider applying rust-resistant paint or powder coating to match your home’s exterior. For wooden carports, staining and sealing the wood will enhance its longevity and appearance.
- Lighting and security features: Motion-activated LED lights, solar-powered lamps, or hardwired floodlights can make your carport safer and more functional at night. For added security, consider installing a surveillance camera or a smart security system.
- Storage and organization: Make the most of your carport by adding shelves, hooks, or storage cabinets for tools, outdoor equipment, or automotive supplies. Overhead racks can help maximize space while keeping the area tidy.
- Landscaping and decorative elements: Surrounding your carport with plants, gravel pathways, or decorative fencing can integrate the structure more naturally into your property. Climbing vines or potted plants can add a stylish touch.
Final Inspection and Adjustments
Before considering the project complete, conduct a thorough final inspection:
- Ensure all bolts, screws, and fasteners are tight.
- Double-check that the structure is level and properly anchored.
- Test any added features, such as lights or drainage systems, to confirm they function correctly.
- Address any minor issues before they become bigger problems, ensuring long-term stability.
By investing time in these finishing touches, your carport will not only be more functional and aesthetically pleasing but also stand up to the elements more effectively, thus providing reliable protection for years to come.
Step 5: Maintenance and Long-Term Care
A well-maintained carport will serve you for many years. It will protect your vehicles and outdoor equipment from the elements. Regular maintenance will contribute to its longevity and prevent costly repairs down the road.
Regular Inspections
- Conduct a thorough inspection at least twice a year, ideally in spring and fall.
- Check for rust, loose screws, and any structural weaknesses.
- Inspect the foundation for shifting, cracks, or signs of water damage.
- Examine roof panels for leaks, warping, or separation at seams.
- Look for signs of pest infestation, particularly in wooden carports.
Cleaning Routine
- Wash metal carports with mild soap and water to remove dirt and debris.
- Use a pressure washer on low settings to clean stubborn grime, avoiding excessive force on joints and fasteners.
- Remove leaves, twigs, and debris from the roof and gutters to prevent water pooling.
- Reapply rust-inhibiting paint or a protective coating annually on metal structures.
- For wooden carports, reseal or repaint every few years to prevent rot and insect damage.
Seasonal Adjustments
- In winter, clear snow from the roof to prevent overloading and structural strain.
- Check anchoring points after strong winds or storms and re-secure if necessary.
- Trim nearby trees to prevent damage from falling branches.
- In humid or coastal areas, apply anti-corrosion treatments more frequently to prevent rust buildup.
Long-Term Protection
- Ensure proper drainage around the carport base to avoid water pooling.
- Consider adding UV-resistant coatings to protect against sun damage, especially for plastic or polycarbonate roofing.
- If you experience frequent strong winds, reinforce the structure with additional braces or tie-down kits.
- Keep an emergency repair kit with essential tools, extra screws, and sealant for quick fixes when needed.
By following a consistent maintenance routine, you can extend the life of your carport and ensure it remains a reliable shelter for years to come.
Choose the best carport from American Steel Carports
Upgrade your home with a durable, weather-resistant carport from American Steel Carports Inc. Whether you’re safeguarding your vehicles, equipment, or outdoor space, our high-quality steel structures are built to last. With customizable options and expert craftsmanship, we make installation easy and hassle-free. Check out our collection here. Contact us today and visit our website to get a free quote!


